Interactivity சேர்த்தல்
Screen-இல் உள்ள சில விஷயங்கள் user input-க்கு பதிலாக update ஆகின்றன. உதாரணமாக, image gallery-யை click செய்வது active image-ஐ மாற்றுகிறது. React-இல், காலத்துடன் மாறும் data state என்று அழைக்கப்படுகிறது. எந்த component-க்கும் state சேர்த்து, தேவையானபடி அதை update செய்யலாம். இந்த chapter-இல், interactions handle செய்யும், தங்கள் state-ஐ update செய்யும், மற்றும் காலத்துடன் வேறுபட்ட output-ஐ display செய்யும் components எழுதுவது எப்படி என்பதை கற்றுக்கொள்வீர்கள்.
இந்த அத்தியாயத்தில் நீங்கள் கற்றுக்கொள்ள போவது
- User-initiated events-ஐ handle செய்வது எப்படி
- State மூலம் components தகவலை “நினைவில்” வைத்திருக்க செய்வது எப்படி
- React இரண்டு phases-இல் UI-யை update செய்வது எப்படி
- State-ஐ மாற்றிய உடனே அது ஏன் update ஆகாது
- பல state updates-ஐ queue செய்வது எப்படி
- State-இல் object-ஐ update செய்வது எப்படி
- State-இல் array-ஐ update செய்வது எப்படி
Events-க்கு பதிலளித்தல்
உங்கள் JSX-க்கு event handlers சேர்க்க React அனுமதிக்கிறது. Event handlers என்பது clicking, hovering, form inputs-ல் focus செய்தல் போன்ற user interactions-க்கு பதிலாக trigger ஆகும் உங்கள் சொந்த functions.
<button> போன்ற built-in components, onClick போன்ற built-in browser events-ஐ மட்டுமே support செய்கின்றன. ஆனால் நீங்கள் உங்கள் சொந்த components-ஐயும் உருவாக்கலாம்; அவற்றின் event handler props-க்கு உங்களுக்கு விருப்பமான application-specific names கொடுக்கலாம்.
export default function App() {
  return (
    <Toolbar
      onPlayMovie={() => alert('இயக்கப்படுகிறது!')}
      onUploadImage={() => alert('Upload செய்யப்படுகிறது!')}
    />
  );
}

function Toolbar({ onPlayMovie, onUploadImage }) {
  return (
    <div>
      <Button onClick={onPlayMovie}>
        Movie-ஐ இயக்கு
      </Button>
      <Button onClick={onUploadImage}>
        Image-ஐ upload செய்
      </Button>
    </div>
  );
}

function Button({ onClick, children }) {
  return (
    <button onClick={onClick}>
      {children}
    </button>
  );
}
Ready to learn this topic?
Event handlers சேர்ப்பது எப்படி என்பதை அறிய Responding to Events-ஐ படியுங்கள்.
Read MoreState: component-ன் memory
Interaction-ன் விளைவாக screen-இல் உள்ளதை மாற்ற components-க்கு அடிக்கடி தேவைப்படும். Form-இல் type செய்தால் input field update ஆக வேண்டும்; image carousel-இல் “next” click செய்தால் காட்டப்படும் image மாற வேண்டும்; “buy” click செய்தால் product shopping cart-இல் சேர வேண்டும். Components விஷயங்களை “நினைவில்” வைத்திருக்க வேண்டும்: current input value, current image, shopping cart. React-இல், இத்தகைய component-specific memory state என்று அழைக்கப்படுகிறது.
useState Hook மூலம் component-க்கு state சேர்க்கலாம். Hooks என்பது உங்கள் components React features-ஐ பயன்படுத்த அனுமதிக்கும் சிறப்பு functions (state அவற்றில் ஒன்று). useState Hook state variable ஒன்றை declare செய்ய அனுமதிக்கிறது. அது initial state-ஐ எடுத்து, இரண்டு values கொண்ட pair-ஐ return செய்கிறது: current state, அதை update செய்யும் state setter function.
const [index, setIndex] = useState(0);
const [showMore, setShowMore] = useState(false);
Image gallery click போது state-ஐ எப்படி பயன்படுத்தி update செய்கிறது என்பதற்கான example:
import { useState } from 'react';
import { sculptureList } from './data.js';

export default function Gallery() {
  const [index, setIndex] = useState(0);
  const [showMore, setShowMore] = useState(false);
  const hasNext = index < sculptureList.length - 1;

  function handleNextClick() {
    if (hasNext) {
      setIndex(index + 1);
    } else {
      setIndex(0);
    }
  }

  function handleMoreClick() {
    setShowMore(!showMore);
  }

  let sculpture = sculptureList[index];
  return (
    <>
      <button onClick={handleNextClick}>
        அடுத்து
      </button>
      <h2>
        <i>{sculpture.name} </i>
        கலைஞர்: {sculpture.artist}
      </h2>
      <h3>
        ({index + 1} / {sculptureList.length})
      </h3>
      <button onClick={handleMoreClick}>
        விவரங்களை {showMore ? 'மறை' : 'காட்டு'}
      </button>
      {showMore && <p>{sculpture.description}</p>}
      <img
        src={sculpture.url}
        alt={sculpture.alt}
      />
    </>
  );
}
Ready to learn this topic?
ஒரு value-ஐ நினைவில் வைத்து interaction போது அதை update செய்வது எப்படி என்பதை அறிய State: A Component’s Memory-ஐ படியுங்கள்.
Read MoreRender மற்றும் commit
உங்கள் components screen-இல் display ஆகும் முன், அவை React-ஆல் rendered செய்யப்பட வேண்டும். இந்த process-இன் steps-ஐப் புரிந்துகொள்வது, உங்கள் code எப்படி execute ஆகிறது மற்றும் அதன் behavior-ஐ எப்படி விளக்குவது என்பதைச் சிந்திக்க உதவும்.
உங்கள் components kitchen-இல் சுவையான dishes-ஐ ingredients-இலிருந்து assemble செய்யும் cooks என்று கற்பனை செய்யுங்கள். இந்த scenario-வில், React customers-இலிருந்து requests எடுத்து அவர்களுக்கு orders கொண்டு வரும் waiter. UI-ஐ request செய்து serve செய்வதற்கான இந்த process மூன்று steps கொண்டது:
- Render ஒன்றை Triggering செய்தல் (diner-ன் order-ஐ kitchen-க்கு deliver செய்தல்)
- Component-ஐ Rendering செய்தல் (kitchen-இல் order-ஐ தயாரித்தல்)
- DOM-க்கு Committing செய்தல் (order-ஐ table-ல் வைப்பது)
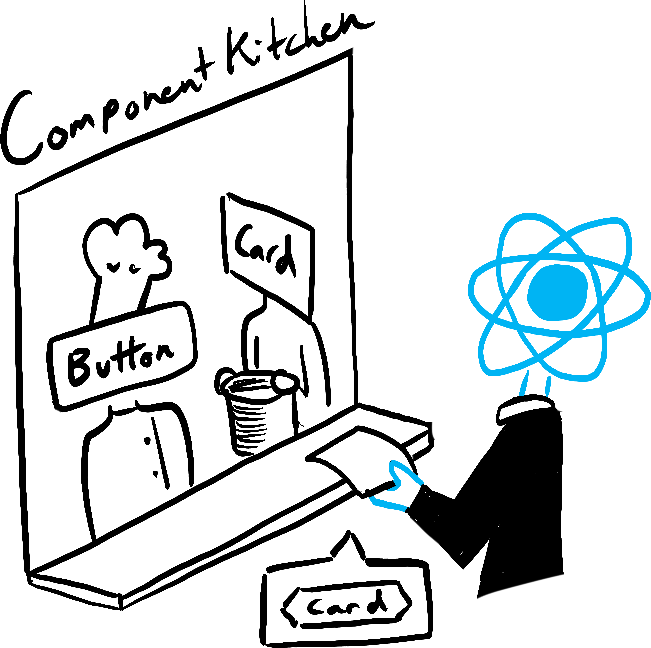
Trigger 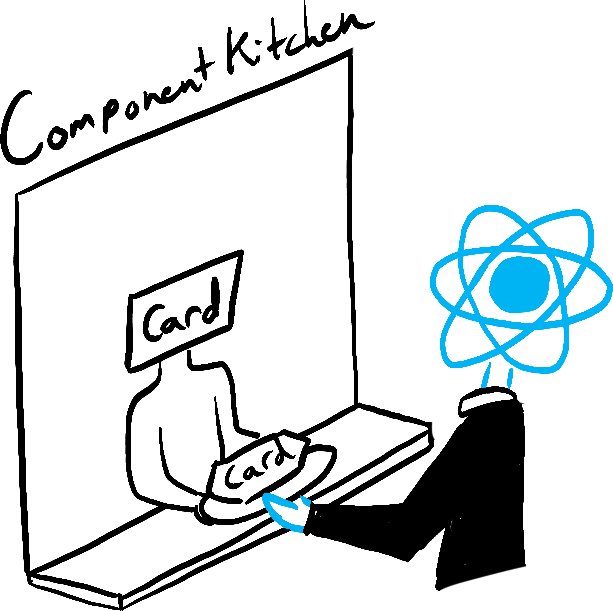
Render 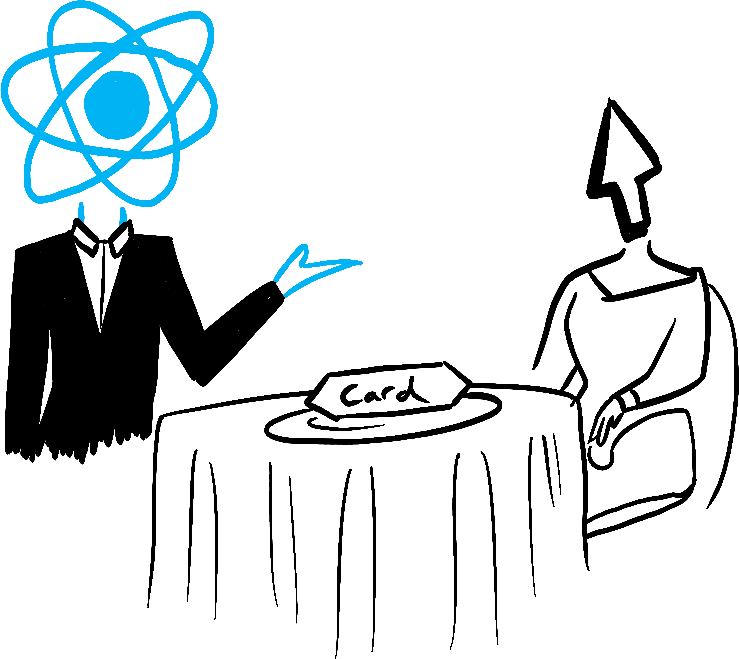
Commit
Illustrated by Rachel Lee Nabors
Snapshot ஆக state
சாதாரண JavaScript variables-க்கு மாறாக, React state snapshot போல நடக்கிறது. அதை set செய்வது உங்களிடம் ஏற்கனவே உள்ள state variable-ஐ மாற்றாது; அதற்கு பதிலாக re-render ஒன்றை trigger செய்கிறது. இது முதலில் ஆச்சரியமாக இருக்கலாம்!
console.log(count);  // 0
setCount(count + 1); // 1 உடன் re-render request செய்
console.log(count);  // இன்னும் 0!
இந்த behavior subtle bugs-ஐத் தவிர்க்க உதவுகிறது. சிறிய chat app ஒன்று இதோ. முதலில் “அனுப்பு” அழுத்தி, பிறகு recipient-ஐ Bob-ஆக மாற்றினால் என்ன நடக்கும் என்று ஊகிக்கவும். ஐந்து seconds கழித்து alert-இல் யாருடைய பெயர் தோன்றும்?
import { useState } from 'react';

export default function Form() {
  const [to, setTo] = useState('Alice');
  const [message, setMessage] = useState('வணக்கம்');

  function handleSubmit(e) {
    e.preventDefault();
    setTimeout(() => {
      alert(`நீங்கள் ${to}-க்கு "${message}" என்று சொன்னீர்கள்`);
    }, 5000);
  }

  return (
    <form onSubmit={handleSubmit}>
      <label>
        பெறுநர்:{' '}
        <select
          value={to}
          onChange={e => setTo(e.target.value)}>
          <option value="Alice">Alice</option>
          <option value="Bob">Bob</option>
        </select>
      </label>
      <textarea
        placeholder="செய்தி"
        value={message}
        onChange={e => setMessage(e.target.value)}
      />
      <button type="submit">அனுப்பு</button>
    </form>
  );
}
Ready to learn this topic?
Event handlers-க்குள் state ஏன் “fixed” ஆகவும் மாறாததாகவும் தோன்றுகிறது என்பதை அறிய State as a Snapshot-ஐ படியுங்கள்.
Read MoreState updates தொடரை queue செய்தல்
இந்த component-இல் bug உள்ளது: “+3” click செய்தால் score ஒருமுறை மட்டுமே increment ஆகிறது.
import { useState } from 'react';

export default function Counter() {
  const [score, setScore] = useState(0);

  function increment() {
    setScore(score + 1);
  }

  return (
    <>
      <button onClick={() => increment()}>+1</button>
      <button onClick={() => {
        increment();
        increment();
        increment();
      }}>+3</button>
      <h1>மதிப்பெண்: {score}</h1>
    </>
  )
}
இது ஏன் நடக்கிறது என்பதை State as a Snapshot விளக்குகிறது. State set செய்வது புதிய re-render ஒன்றை request செய்கிறது, ஆனால் ஏற்கனவே running code-இல் அதை மாற்றாது. எனவே setScore(score + 1) call செய்த உடனேயும் score தொடர்ந்து 0 ஆகவே இருக்கும்.
console.log(score);  // 0
setScore(score + 1); // setScore(0 + 1);
console.log(score);  // 0
setScore(score + 1); // setScore(0 + 1);
console.log(score);  // 0
setScore(score + 1); // setScore(0 + 1);
console.log(score);  // 0
State set செய்யும்போது updater function ஒன்றை pass செய்வதன் மூலம் இதை fix செய்யலாம். setScore(score + 1)-ஐ setScore(s => s + 1)-ஆல் replace செய்வது “+3” button-ஐ எப்படி fix செய்கிறது என்பதை கவனியுங்கள். இது பல state updates-ஐ queue செய்ய அனுமதிக்கிறது.
import { useState } from 'react';

export default function Counter() {
  const [score, setScore] = useState(0);

  function increment() {
    setScore(s => s + 1);
  }

  return (
    <>
      <button onClick={() => increment()}>+1</button>
      <button onClick={() => {
        increment();
        increment();
        increment();
      }}>+3</button>
      <h1>மதிப்பெண்: {score}</h1>
    </>
  )
}
Ready to learn this topic?
State updates தொடரை எப்படி queue செய்வது என்பதை அறிய Queueing a Series of State Updates-ஐ படியுங்கள்.
Read MoreState-இல் objects update செய்தல்
State, objects உட்பட எந்த வகையான JavaScript value-ஐயும் hold செய்ய முடியும். ஆனால் React state-இல் வைத்திருக்கும் objects மற்றும் arrays-ஐ நேரடியாக மாற்றக்கூடாது. அதற்கு பதிலாக, object அல்லது array-ஐ update செய்யும்போது, புதிய ஒன்றை உருவாக்க வேண்டும் (அல்லது existing ஒன்றின் copy செய்ய வேண்டும்), பின்னர் அந்த copy-ஐப் பயன்படுத்த state-ஐ update செய்ய வேண்டும்.
பொதுவாக, மாற்ற விரும்பும் objects மற்றும் arrays-ஐ copy செய்ய ... spread syntax-ஐ பயன்படுத்துவீர்கள். உதாரணமாக, nested object-ஐ update செய்வது இதுபோல் இருக்கலாம்:
import { useState } from 'react';

export default function Form() {
  const [person, setPerson] = useState({
    name: 'Niki de Saint Phalle',
    artwork: {
      title: 'Blue Nana',
      city: 'Hamburg',
      image: 'https://react.dev/images/docs/scientists/Sd1AgUOm.jpg',
    }
  });

  function handleNameChange(e) {
    setPerson({
      ...person,
      name: e.target.value
    });
  }

  function handleTitleChange(e) {
    setPerson({
      ...person,
      artwork: {
        ...person.artwork,
        title: e.target.value
      }
    });
  }

  function handleCityChange(e) {
    setPerson({
      ...person,
      artwork: {
        ...person.artwork,
        city: e.target.value
      }
    });
  }

  function handleImageChange(e) {
    setPerson({
      ...person,
      artwork: {
        ...person.artwork,
        image: e.target.value
      }
    });
  }

  return (
    <>
      <label>
        பெயர்:
        <input
          value={person.name}
          onChange={handleNameChange}
        />
      </label>
      <label>
        தலைப்பு:
        <input
          value={person.artwork.title}
          onChange={handleTitleChange}
        />
      </label>
      <label>
        நகரம்:
        <input
          value={person.artwork.city}
          onChange={handleCityChange}
        />
      </label>
      <label>
        படம்:
        <input
          value={person.artwork.image}
          onChange={handleImageChange}
        />
      </label>
      <p>
        <i>{person.artwork.title}</i>
        {' - கலைஞர்: '}
        {person.name}
        <br />
        ({person.artwork.city}-இல் உள்ளது)
      </p>
      <img
        src={person.artwork.image}
        alt={person.artwork.title}
      />
    </>
  );
}
Code-இல் objects copy செய்வது tedious ஆக இருந்தால், repetitive code-ஐ குறைக்க Immer போன்ற library ஒன்றை பயன்படுத்தலாம்:
{
  "dependencies": {
    "immer": "1.7.3",
    "react": "latest",
    "react-dom": "latest",
    "react-scripts": "latest",
    "use-immer": "0.5.1"
  },
  "scripts": {
    "start": "react-scripts start",
    "build": "react-scripts build",
    "test": "react-scripts test --env=jsdom",
    "eject": "react-scripts eject"
  },
  "devDependencies": {}
}
Ready to learn this topic?
Objects-ஐ சரியாக update செய்வது எப்படி என்பதை அறிய Updating Objects in State-ஐ படியுங்கள்.
Read MoreState-இல் arrays update செய்தல்
Arrays என்பது state-இல் store செய்யக்கூடிய மற்றொரு mutable JavaScript objects வகை; அவற்றை read-only ஆக நடத்த வேண்டும். Objects போலவே, state-இல் store செய்யப்பட்ட array-ஐ update செய்யும்போது, புதிய ஒன்றை உருவாக்க வேண்டும் (அல்லது existing ஒன்றின் copy செய்ய வேண்டும்), பின்னர் புதிய array-ஐ பயன்படுத்த state set செய்ய வேண்டும்:
import { useState } from 'react';

const initialList = [
  { id: 0, title: 'Big Bellies', seen: false },
  { id: 1, title: 'Lunar Landscape', seen: false },
  { id: 2, title: 'Terracotta Army', seen: true },
];

export default function BucketList() {
  const [list, setList] = useState(
    initialList
  );

  function handleToggle(artworkId, nextSeen) {
    setList(list.map(artwork => {
      if (artwork.id === artworkId) {
        return { ...artwork, seen: nextSeen };
      } else {
        return artwork;
      }
    }));
  }

  return (
    <>
      <h1>கலை பார்க்க வேண்டிய பட்டியல்</h1>
      <h2>நான் பார்க்க வேண்டிய கலைப் பட்டியல்:</h2>
      <ItemList
        artworks={list}
        onToggle={handleToggle} />
    </>
  );
}

function ItemList({ artworks, onToggle }) {
  return (
    <ul>
      {artworks.map(artwork => (
        <li key={artwork.id}>
          <label>
            <input
              type="checkbox"
              checked={artwork.seen}
              onChange={e => {
                onToggle(
                  artwork.id,
                  e.target.checked
                );
              }}
            />
            {artwork.title}
          </label>
        </li>
      ))}
    </ul>
  );
}
Code-இல் arrays copy செய்வது tedious ஆக இருந்தால், repetitive code-ஐ குறைக்க Immer போன்ற library ஒன்றை பயன்படுத்தலாம்:
{
  "dependencies": {
    "immer": "1.7.3",
    "react": "latest",
    "react-dom": "latest",
    "react-scripts": "latest",
    "use-immer": "0.5.1"
  },
  "scripts": {
    "start": "react-scripts start",
    "build": "react-scripts build",
    "test": "react-scripts test --env=jsdom",
    "eject": "react-scripts eject"
  },
  "devDependencies": {}
}
Ready to learn this topic?
Arrays-ஐ சரியாக update செய்வது எப்படி என்பதை அறிய Updating Arrays in State-ஐ படியுங்கள்.
Read Moreஅடுத்து என்ன?
இந்த chapter-ஐ page by page படிக்கத் தொடங்க Responding to Events-க்கு செல்லுங்கள்!
அல்லது, இந்த topics உங்களுக்கு ஏற்கனவே தெரிந்திருந்தால், Managing State பற்றி படிக்கலாமே?